Tuesday, November 30, 2010

Fly Away - Day 2

I hope that you are enjoying Fly Away as much as I am.  I was somewhat skeptical when I first chose this set, but now that I have a few projects under my belt I know that it was the right choice.  For today, I have a fun little card and accompanying treat.


When I was a little girl, I saw an airplane similar to this at an Air Show in my home town.  Seriously, I should have known then that I was going to be a lifelong crafter.  I still remember how they went together years later (honestly it was like 22 years ago!)  I haven't ever made any and thought there was no better time.


I modified my candy plane from the original design.  The plane I saw as a girl was made from smarties, a single stick of gum, lifesaver wheels, and a rubber band.  I wanted an upgrade.  :)  So, I used a roll of lifesavers (covered in paper so it was "prettier"), a small pack of gum, and some round buttons.  I wanted to give these out in my son's class.  The original design called for lifesaver wheels.  However, that required me unwrapping the Life Savers.  :)  How times have changed!  Sure daughter go ahead and eat that Life Saver that has been touched by many hands and unwrapped for days; no big deal.  :)  I chose the sanitary road.  I also wrapped mine in twine instead of a rubber band.  Again, can you imagine a class of 31 first and second graders all armed with a rubber band.  :)  I can hear all the teachers thanking me.

For the focal point of my small square notecard, I layered some dies with a cut out airplane.  I used a little doodling on the white scalloped die cut.  It was intimidating at first, but now I am addicted to getting out my markers and adding a little doodle.  :)  I used a 1.75 inch punched circle as a template for the circle and then freehanded the dots.  Such fun!

Thanks for joining me for day 2.  I hope you are enjoying all the fun things that can be done with these small planes.  Tomorrow I have a similar, non-card project to share.

Supplies - All Papertrey Ink unless noted:
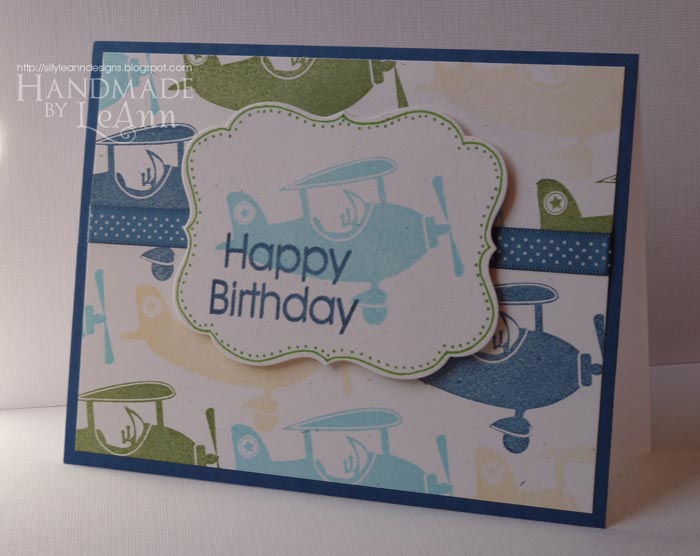
Reach for the Sky
Stamps:  Fly Away, Up Up and Away, Round and Round
Paper: Rustic White, Blueberry Sky
Ink: Spring Rain, Fresh Snow, Smokey Shadow, Noir (Pallette)
Other: Mat Stack 1 Die, Limitless Labels Die, Copics, Blue Jay ZIG Writer
Candy Airplane
Rustic White Cardstock, Life Savers Roll, Blue circle buttons (My Minds Eye), Small pack of stick gum, Rustic Twine

Monday, November 29, 2010

Welcome to One Week with . . . Fly Away

I have to admit something.  Although I am absolutely in love with the adorable stamp set, Fly Away, I didn't ink it until starting projects for this week.  It is a super cute little set.  You can get it at Papertrey Ink for only $5!  I have a really hard time coming up with boy or masculine cards, so this was the biggest motivation for buying it.  Couple that with my insane infatuation of Up, Up, and Away (also by Papertrey Ink), and it was a must have.

For the next week, I am going to go into my little craft space and see what comes out.  So, without further ado . . . Fly Away . . .


This is by far my FAVORITE cards that I have made.  I don't know what it is - the colors, the pattern - but I love it.  I used the solid airplane stamp to create a patterned paper.  I was so happy with the outcome.  Do you like the little green around the Mat Stack 1?  I just doodled that on with a marker.  Easy peasy and only took about a minute to complete!  I just love small details like that on cards and am super shocked with how easy this came together.

I have another card to share that uses a similar technique.  I used the outline airplane this time to create a patterned paper for the background.  Oh, I just love this little set of stamps!


I cannot wait to give this card!   Like I said, I have a really hard time with masculine cards.  I thought this made a great male card with the colors, print, and sentiment.  I love it when things come together easily and without a fuss.  Do you know what I mean?  This card was super easy and could be done in different colors for different occasions.

Thanks for joining me on this very first day of One Week With . . . Fly Away.  I cannot wait to show you some of the other things that I have come up with and a few that have yet to be made.  *wink* I have already gotten my $5 worth just from these two cards.  I am so glad that I chose this set to showcase.  It really has grown into a favorite little set of mine.

Supplies Used - All Papertrey Ink unless noted:
Happy Birthday
Stamps: Happy Birthday (SillyLeAnn Designs 2.0),  Fly Away
Paper: Rustic White, Enchanted Evening
Ink: Enchanted Evening, Lemon Tart, Simply Chartreuse, and Hawaiian Shores
Other: Mat Stack 4 Die, Enchanted Evening Bitty Dots Ribbon, Spring Green ZIG Writer
World's Best Grandpa
Stamps: World's Best (Verve Stamps); Fillable Frames #4, Fly Away
Paper: Kraft
Ink: Dark Chocolate, Ripe Avocado, Scarlett Jewel
Other: Scarlet Jewel Buttons, Fillable Frames #4 Die, Rustic Twine

Friday, November 5, 2010

Final Day with Damask Designs

Well, the week with Damask Designs has come to a close.  I had a great time making all the fun things, scoping other's projects, and sharing something that I truly love.  Thank you for taking the time to join me.

I wanted to close out the week with a final card.  I made this for my niece who is a girly-girl.  I know the design is rather "loud", but I am certain it is perfect for her.


-All Papertrey Ink unless noted-
Stamps: Damask Design, Fillable Frames #1, Polka Dot Basics II
Paper: Stampers Select White, Raspberry Fizz
Ink: True Black, Raspberry Fizz, Versa Mark
Other: Ribbon (Rabom), Bow (Hobby Lobby), Fillable Frames #1 Die, Jewels (Kaiser)

The next "One Week With" will start on November 29, 2010.  I look forward to sharing another love of mine!

Thursday, November 4, 2010

Damask Designs - Day 4

Welcome to Day 4 of One Week with Damask Designs!

I wanted to share a card and then highlight some things made with Damask Designs that I have seen around the web and blogs that I visit.  So, sit back . . . this could go on forever.  :)

I didn't make a background this time - shock!  But, I love the impact that this Pure Poppy Damask stamp has.  I have been wanting to do some clean and simple cards lately.  This is as close as I am going to get I am afraid.  So enjoy my version of CAS.

-All Papertrey Ink unless noted-
Stamps: Damask Designs
Paper: Vintage Cream, Smokey Shadow
Ink: Pure Poppy, Smokey Shadow, Tea Dye Duo
Other: Pure Poppy Bakers Twine


I wanted to share another card I made and previously posted on my blog.

Original post here

Because Damask Designs is one of my favorite stamp sets, I spot it everywhere I go.  I just wanted to point a few out that I thought were super fabulous.  Please go visit these talented artists and if possible leave them some love.

Because I am such a PTI fan, I have found some other fans that I visit their blogs regularly.  Laurie is one of those bloggers.  When I saw this card, I immediately fell in love.  You can see the original at Laurie's blog - soapboxcreations.  And speaking of Laurie, I noticed that she just posted these two on her blog as well.  You can see the originals here.

I loved the colors on this card by "resqbarbie" at SCS.  You can view her card here.

The last one I wanted to share is such a beautiful card.  This card is by Maureen and you can see it on her blog.  And she has TONS of cards made with Damask Designs or similar.  You really should check them all out by clicking here.  

Wednesday, November 3, 2010

Damask Designs - Day 3

It is already DAY 3!!!  This is certainly going very fast.  I am excited to show you a fun little gift idea.  So, enough chat . . . let's get to it.

I used Papertrey Ink's Favor It #2 die to make the little bag.  It is made from Ocean Tides cardstock and stamped with coordinating colors of Aqua Mist and Vintage Cream.

The Favor It #2 Die is super easy to cut very quickly!  It takes a single piece of cardstock and you cut two for each little bag.  I choose Ocean Tides for this project.


Next, I used Vintage Cream ink to stamp the damask background stamps across both die cuts.  I then stamped the sides so that the bag would look more fluid.  When the bag is fully assembled, the damask pattern is solid around the entire bag.  Then, I folded all the score lines and added scor-tape to the sides and the bottom.  (Well, technically I use an off brand of adhesive tape, but it gets the job done.)


Here is a look at the bare assembled bag.

I cut some tissue paper down to size to fit perfectly in my bag.  I stamped around the edges with Aqua Mist and the background damask.  I used a single larger damask to stamp the corners of the tissue with Ocean Tides.  I die cut and stamped the tag using Fillable Frames #9.  I used the next to smallest damask in Aqua Mist to adorn the background of the tag.  Add some Aqua Mist and Vintage Cream Ribbon and attach the tag with Rustic Twine and the gift bag is complete.
Such a fun bag!  I just love how pretty and elegant the damask is for a gift like this.  I could use it for so many things and a variety of ages depending on the color palette.

Thanks for stopping by today.

Supplies used are Papertrey Ink unless noted:
Stamps: Damask Designs, Fillable Frames #9
Paper: Ocean Tides, Aqua Mist, Vintage Cream
Ink: Vintage Cream, Aqua Mist, Ocean Tides
Other: Favor It #2 Die, Fillable Frames #9 Die, Ocean Tides and Vintage Cream Ribbon, Rustic Twine

Tuesday, November 2, 2010

Damask Designs - Day 2

Welcome to the second day!  I am so excited to show you a project that I made for my sister.  So let's get to it, shall we?

It all started with a card I made a couple of weeks ago.

-All Papertrey Ink unless noted-
Stamps: Damask Designs
Paper: Kraft, Vintage Cream
Ink: True Black, Smokey Shadow, Tea Dye Duo
Other: Vintage Cream Ribbon, Die Cut Letters (Cuttlebug), Chipboard (from stash)

I loved the results of this card; and when I was working on a blog hop for Taylored Expressions, I went back to this design.

Details can be found here

My sister went on and on about how much she liked this, how classic it was, how it would look good in Happy Birthday, and in her possession.  :)  So, I obliged.

And here was the result:

I was pleased with the outcome.  She was pleased.  I was pleased she was pleased.  Okay, you get the picture.  Here are some shots of a few of the cards:

Green is her favorite color.  This one is done in Ripe Avocado.

Done in Scarlet Jewel.

Done in Raspberry Fizz.

Somehow I didn't end up with shots of the Ocean Tides or True Black card.  But, you get the idea.  Which one is your favorite?  Would you have done a different color?  I always think it is fascinating to see what other people see.

Thanks for looking.  I had a blast making these and sharing them with the world.  :)

Card Set Details:
-All Papertrey Ink unless noted-

Stamps: Damask Designs, Fillable Frames #4
Paper: Kraft, Vintage Cream
Ink: Smokey Shadow, Tea Dye Duo, Raspberry Fizz, Ripe Avocado, Ocean Tides, True Black, Scarlet Jewel
Ribbon: Ocean Tides Satin, True Black Satin, Simply Chartreuse Bitty Dots, Scarlet Jewel Bitty Dots, Raspberry Fizz Satin
Other: Fillable Frames #4 Die

Monday, November 1, 2010

Welcome to the Very First One Week With . . .

I have decided to start a new series called "One Week With . . ."  Each month I will choose a different stamp set to highlight.  It is my desire to showcase some of my favorite stamps or perhaps products.  So, why a whole new blog?  I am a compartmentalizer.  :)  It really is as simple as that.

So, welcome to the very first "One Week With . . .

Damask Designs!

Damask Designs is a staple for me.  I love all the backgrounds and beauty that this stamp set will make.  I don't pretend to be the best designer, but I would love for you to follow me around as I highlight one of my all time favorite stamp sets - Damask Designs.

Here is a look at my much loved stamp set taken in my little bitty craft studio.
You will notice all the gorgeous single and pattern making images with several beautiful sentiments.  My background making stamp is stained from all the use of it combined with PTI's Tea Dye Duo.  Another favorite part about this set is the tiny little damasks that I use on tags and behind sentiments.  One of my absolute favorite things to do with this set is to heat emboss pattern paper with it.  Let me share a new card that I made using this very technique.

-All Papertrey Ink unless noted-
Stamps: Damask Designs, Just the Ticket
Paper: Smokey Shadow, Rustic White
Ink: VersaMark, Smokey Shadow, True Black
Other: Limitless Layers #1 Dies, Vintage Cream Ribbon, Clear Embossing Powder (Ranger)

I made another card using this same technique a little while back and it was shared on my blog.

Details can be found here

Thank you for joining me on the inaugural day of "One Week With . . ."  I look forward to sharing a few more cards and perhaps a non-card item as well throughout the week.  I hope you will come back.

Damask Designs is available at Papertrey Ink.  I am in no way affiliated with them except for the restraining order from stalking their web page so much.  Ok, I am totally joking about the second part, but I am a HUGE Papertrey Ink fan and most of my stamp picks will be Papertrey Ink.